The embroidery lettering system can produce embroidery texts in seconds literally. This is as easy as selecting the font to use, writing the text and voila! No need to create every embroidery objects to build a design with texts! There are many available features to graphically create unlimited amazing embroidery texts with a few clicks. |
|

Full featured Integrated Embroidery Lettering
You can create embroidery text objects easily. Each text object contains several letter objects. Each letter object contains several embroidery objects. Each embroidery object produces stitches. The embroidery lettering system is then a shortcut to quickly produce embroidery designs with texts skipping the digitizing process. The lettering system will also allow you to edit the text properties (font, characters, spacing, fill style, layout, etc), the letters properties (scale, position) and the objects properties (geometry, fill properties, etc).
Lettering with Pre-digitized Fonts
You can create embroidery designs with text based on fonts created specially for this application by professional embroidery digitizers.
Available pre-digitized fonts depend on the software configuration, and many more pre-digitized fonts may be available as extra components (included in packs or individual fonts) on demand.
Lettering with True Type Fonts
You can create embroidery designs with text based on True Type Fonts.
These types fonts are already included with your Windows operating system, but you can enlarge the available library with tens of thousands of new true type fonts available (free or charged) in Internet. The result of the true type font conversion depends on the selected font and the fill properties.
* True Type Font compatibility may be an extra feature for some software configurations.
The text creation sequence
This is the sequence of steps to create and insert an embroidery text made with the lettering system on the design. If you skip some steps, the application will use the default values (the values you have used the last time).
1.Activate the Lettering System (tooltab EMBROIDERY, LETTERING function)
2.Select the type of font (pre-digitized font or true type font)
3.Select the font from the font catalog
4.Set the size of the letters (character box size, before any transformation)
5.Type the text (using the available characters)
6.Set the letter spacing, word spacing and lines spacing.
7.Adjust the fill properties including trims or lock stitches if necessary.
8.Select the text layout (line, circle, etc)
9.Confirm and edit the text object if necessary
Most of the mentioned actions can be executed on the tooltab LETTERING. However, the OBJECT INSPECTOR shows all those tools and more properties, which are better organized. We suggest to use the OBJECT INSPECTOR to have a total control of the text objects.
Tooltab LETTERING

Object Inspector
Tab 1: MAIN |
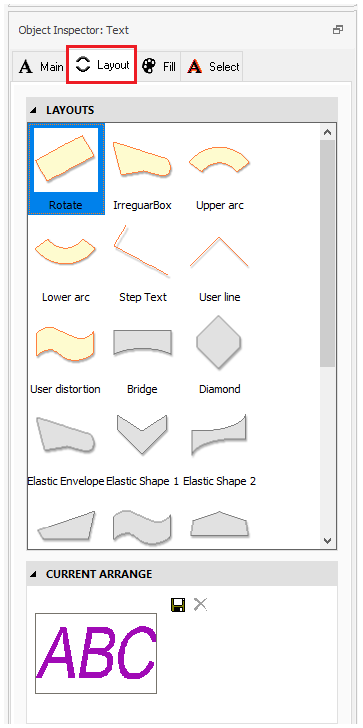
Tab 2: LAYOUT |
Tab 3: FILL |
 |
 |
 |
Properties are classified by: •TEXT •FONT •SPACING, TRIM, LOCK •ADVANCED SETTINGS |
These are the Layout options. For more info, please read the Lettering Layouts article. |
These are the Fill Properties. There are 2 tabs *: •BODY, for the area fill. •BORDER, for the outline * it depends on the font type |
Lettering system features |
|---|