What is an Area object?
|
An area is an object type made of a continuous sequence of nodes that define the geometry of the object, where the last node matches with the first one (a closed shape). The shape defined by the nodes is the outline of the area object. The properties of the nodes define if the segments between the nodes are straight lines or curves, and if the node shows a continuity or a discontinuity (also known as corner) of the curves (*). The main requirement for area object is that: No part of the object's outline should cross another part of the same outline, as it me produce unpredictable results (that is not an area).
There are 3 sub-types of areas according to the kind of "direction lines":
|
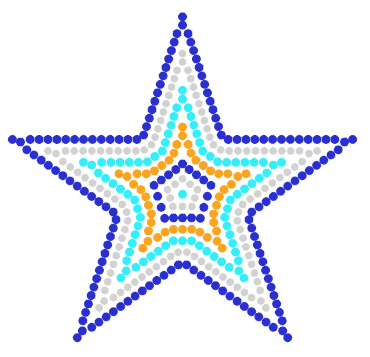
Samples of Area Objects with several Bling Fill styles.
|
|
|


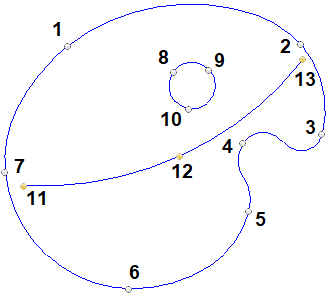
Elements of the Area Object
|
•Sequence of nodes of the outline (1-7) •Sequence of nodes of the hole 1 (8-10) •Direction line (11-13)
Nodes: They are points of the geometry of the object (shape), which include properties to define the segment (line or curve) between 2 consecutive nodes. Direction Line (when required): They are 2 points that represent the direction (orientation, angle) of rows of bling beads according the main fill style. If the direction line is not specified, the application will define it as an horizontal line. Flexible Direction Line (when required): This is a path with nodes (line or curve) that represent the direction of bling beads according to the main fill style. If the direction line is not specified, the application will define it as an horizontal line. |
How to create an Area Object?
➢Click on CREATE OBJECT, on the MAIN bar and select the AREA Object + Flat Bling fill style (or any other bling fill style). You can select the object type from the tooltab BLING or through the drop-down menu on the CREATE OBJECT arrow. ➢Click on MANUAL digitizing. ➢Insert the OUTLINE NODES in the workspace (read about node properties to create straight or curve line segments). ➢Click on HOLES if you want to add one or more holes on the object. ➢Insert the HOLE NODES in the workspace (read about node properties to create straight or curve line segments). ➢Repeat this step if more holes are required. ➢Click on DIRECTION if the selected object includes a Direction Line or a Flexible Direction. ➢For Direction Line: Insert the 2 ends of the direction line in the workspace. ➢For Flexible Direction: Insert the nodes of the direction path (read about node properties to create straight or curve line segments). ➢Click on ENTER or click on Accept/OK from the context menu to confirm the object. |
|
Standard Bling Fill Styles for Area Object |
|---|
|
Advanced Bling Fill Styles for Area Object |
|---|
|
Multi-Bling Fill Styles for Area Object |
|---|
•Area + Uniform Multi-Bling Fill •Area + Flexible Multi-Bling Fill •Area + Inner Ring Multi-Bling Fill •Area + Outer Ring Multi-Bling Fill (advanced, color) •Area + Texture Bling Fill (standard) |