This tools analyzes the image to recognize the colors and the geometry (shapes). While on vector images the shapes are already defined, raster images are vectorized to create the shapes according to the image colors. Then, this tool decides which kind of object type is the best representation for each shape, and it creates the required objects for the design (paths, simple areas, complex areas, etc). Art to Stitch can produce designs with different kind of embroidery objects as mentioned, or with just one kind of embroidery objects (area only).
This is an automatic embroidery design creation (or conversion) from an image. The final result mainly depends on the quality of the original image. After the embroidery design is automatically created, you can edit each created object (both the geometry and its properties).
This article explains how to use Art to Stitch:
•using Raster Images
•using Vector Images
Art to Stitch using Raster (bitmap) Images
|
|
|
|
|

Suggestions to obtain the best result using Art to Stitch
The image attributes are the keys to obtain the best result. Inappropriate images may produce ungraceful designs with poor quality or errors while trying to convert them to embroidery designs. Edit the image if you think the image does not follow the guidelines indicated here:
•Art to Stitch algorithm recognizes image regions with pure colors only. Avoid colors blending and mixed colors.
•Art to Stitch converts regions of pixels to objects (vectorizer) properly when region borders are clearly defined. Use images with well-defined shapes and borders.
•Small areas may produce unnecessary objects. Avoid small areas.
•The image resolution is important. Use values around 250 pixels per inch (100 pixels per centimeter).
Load a Raster Image
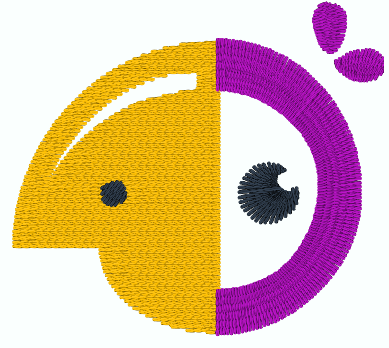
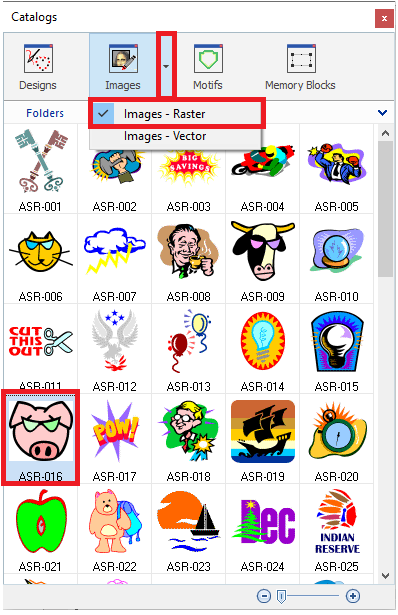
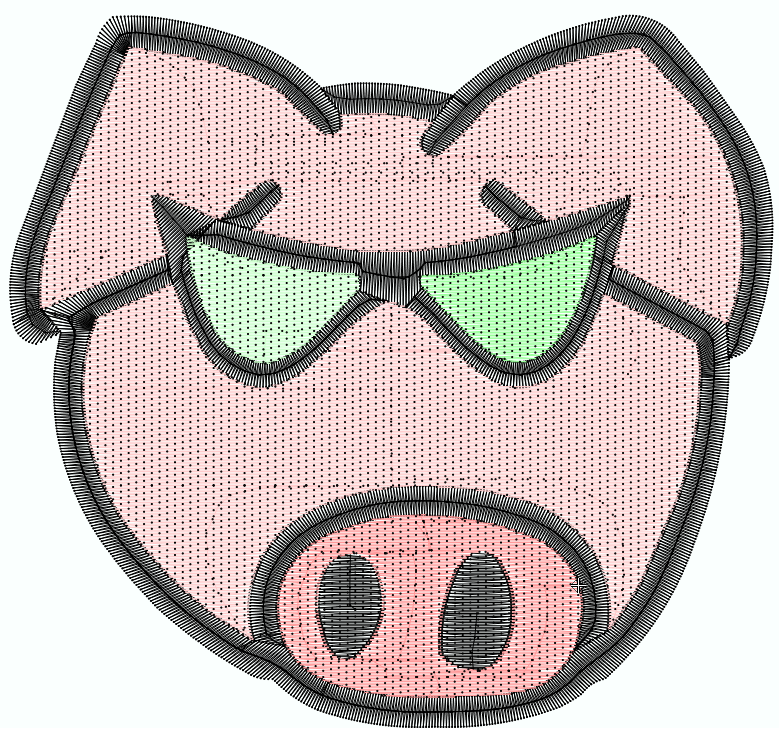
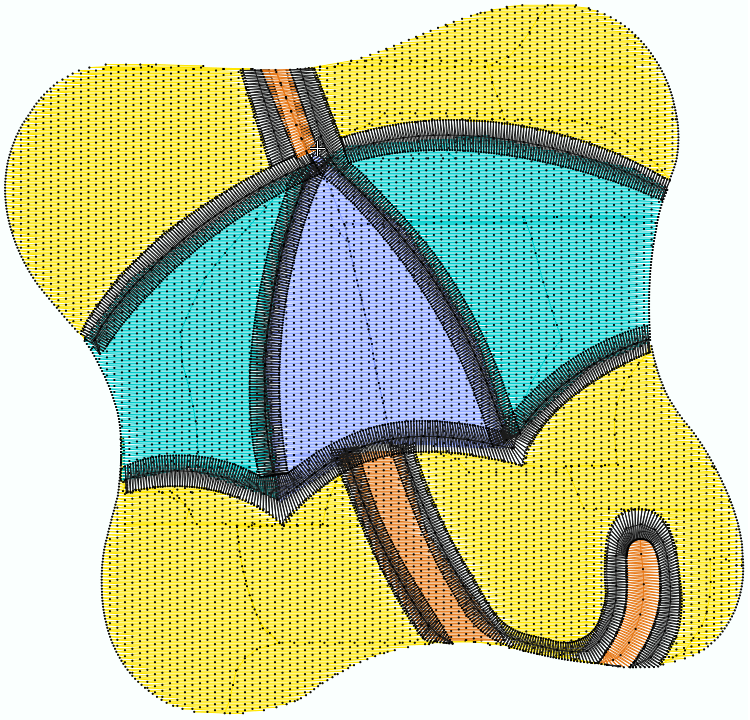
Open/load a raster image (from file, from scanner, etc). We use an image from the Catalog. ➢Click on CATALOGS, on the MAIN toolbar. ➢Select a media type (we use Raster Images). ➢Select the file folder. ➢The bottom panel of the Catalog displays the content of the folder according to the selected media type. ➢Select the "ASR-016" raster image from the "Artwork > Raster" folder. ➢Drag the image into the workspace to load it. |
|
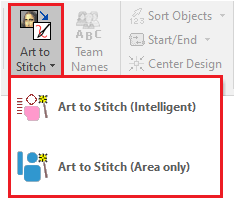
➢Select the tooltab EMBROIDERY
➢Click on the Art to Stitch" tool. |

➢Select the Art to Stitch mode: oArt to Stitch (Intelligent): It creates embroidery objects of different kinds (path with running stitches, area with zig-zag stitches, area with pattern stitches) according to the region shape. oArt to Stitch (Area only): It creates embroidery objects of one kind only (area with pattern stitches). |
|
Art to Stitch toolbox
The Art to Stitch toolbox is displayed. You can define some parameters to make the conversion.
The Art to Stitch toolbox has 4 tabs: •Basic Settings •Color Settings •Needle Settings •Stitch Settings |
|
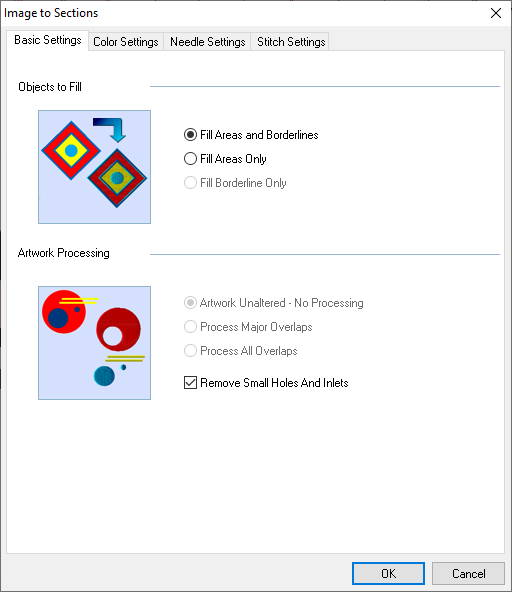
Basic Settings
You can specify which kind of objects to create, and indications about how to process the overlapped objects.
|
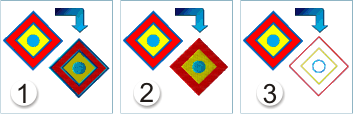
➢Specify the type of objects you want for the design.
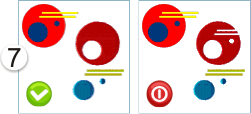
1.Fill Areas and Borderlines (X) 2.Fill Areas Only 3.Fill Borderline Only ➢Define how to process very small areas (sometimes are missing pixels)
7.Remove Small Holes And Inlets (X) |
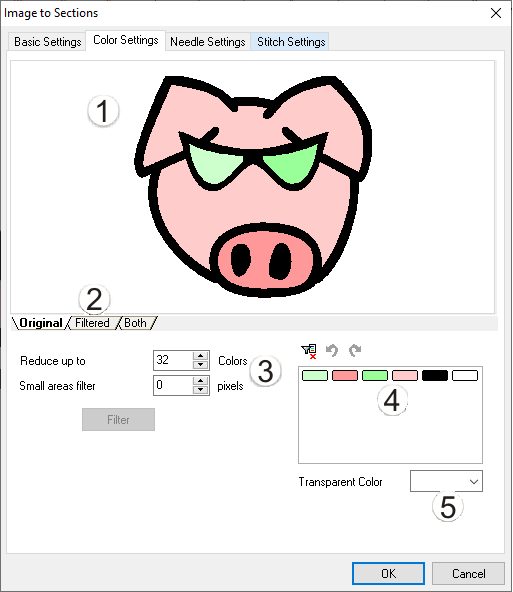
Color Settings
Specify how to reduce the color count of the image and how many colors do you want to keep. You must try to reduce the number of colors as much as possible without affecting the expected result while getting a reasonable design resolution.
|
This panel has the following tools: 1.Preview box: to see the original image and compare with the processed image 2.Previews tabs: to select between the original image and the processed image 3.Reduce Color filter 4.Color Merging tool 5.Transparent Color setting Reduce the color count: ➢Select the number of color you would like to keep (eliminating most of the unnecessary colors) on the Reduce Colors Filter. ➢Click on Filter button. If the resulting image loses quality greatly, increase the number of colors and repeat the filtering process again (you can delete more colors later). Remove the image noise: ➢Set the number of contiguous pixels that should be considered as noise on the image (3, 4, 6...) to avoid very small holes ➢Click on the Filter button. Combine similar colors: You can merge similar colors to reduce the number of colors and get better defined colors. ➢Use Ctrl + Click to select two or more colors to merge ➢Click on the Combine button. If the result does not satisfy your needs, use the Undo/Redo buttons. You can repeat this steps for all the colors you want to merge. Set the transparent color: ➢The drop-down list shows the colors on the image. Select the background color, that is, the color that should not produce stitches as it is not part of the design. |
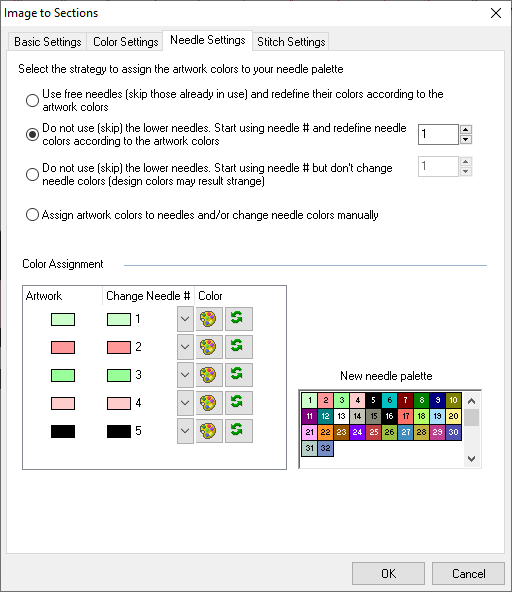
Needle Settings
Specify which is the needle and thread color to use for each color of the image.
|
➢Select any of the following options: oOption #1: It is the default option. Allows to use free needles, skip those already in use and redefine their colors according to the artwork colors. oOption #2: Allows to select the starting needle # and redefine their colors according to the artwork colors. Please avoid using the lowers needles. oOption #3: Allows to select the starting needle #, however it will not change the needle colors. Therefore, design colors will look different than the artwork colors. Please avoid using the lowers needles. oOption #4: Allows to assign artwork colors to needles and/or change needle colors manually from the Color Assignment box. |
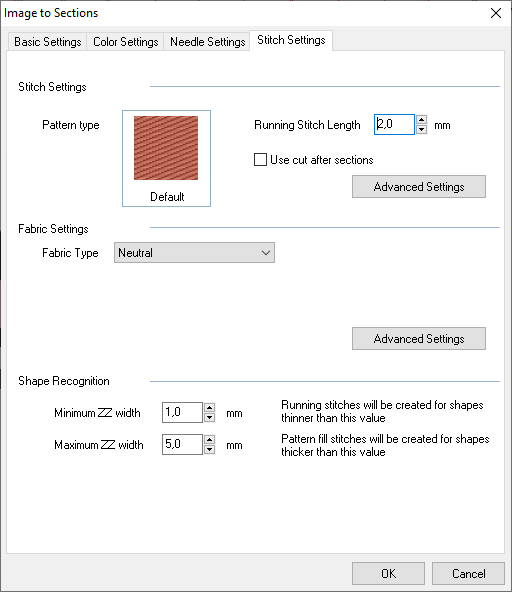
Stitch Settings
Complete the settings related to the fill stitches and the object recognition parameters.
|
Stitch Settings: ➢Select the pattern type by pressing on the pattern image. ➢Set the running stitch length ➢If necessary, modify the fill style, underlay and compensation properties through the Advanced Settings button. Fabric Settings: ➢Select the fabric type for the design on the drop-down menu. ➢If necessary, use the material editor through the Advanced Settings button Object Recognition: ➢Set the parameters to define the minimum and maximum width to be considered zig-zag stitches: •Minimum ZZ width: Running Stitches will be created for shapes thinner than this value. •Maximum ZZ width: Pattern fill stitches will be created for shapes thicker than this value. |
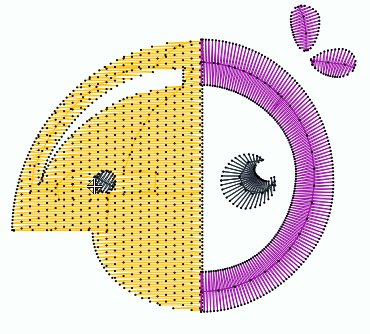
➢Press the OK button to create the embroidery design according to the image and the defined parameters.
|
➢Click on the Simulation View button (or F7 key) to hide the background image and show the simulated stitches.
Art to Stitch using Vector Images
|
|
|
|
|


Suggestions to obtain the best result using Art to Stitch
The image attributes are the keys to obtain the best result. Inappropriate images may produce ungraceful designs with poor quality or errors while trying to convert them to embroidery designs. Edit the image if you think the image does not follow the guidelines indicated here:
•Art to Stitch algorithm recognizes image regions with pure colors only. Avoid colors blending and mixed colors.
•Art to Stitch converts regions of pixels to objects (vectorizer) properly when region borders are clearly defined. Use images with well-defined shapes and borders.
•Small areas may produce unnecessary objects. Avoid small areas.
•The image resolution is important. Use values around 250 pixels per inch (100 pixels per centimeter).
Load a Raster Image
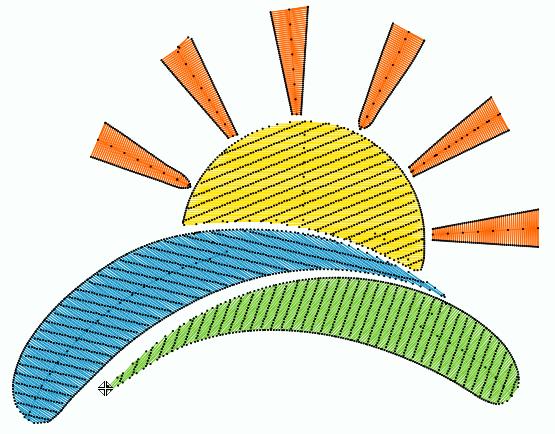
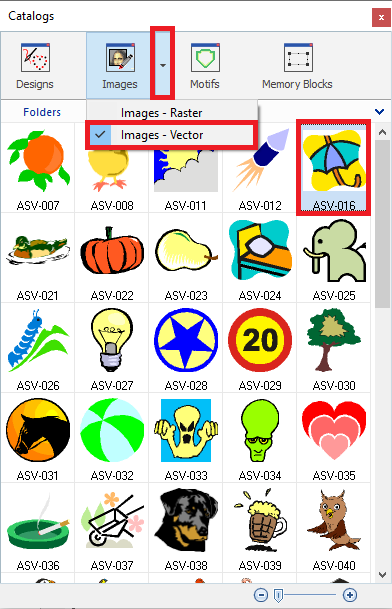
Open/load a vector image (from file, from other application, etc). We use an image from the Catalog. ➢Click on CATALOGS, on the MAIN toolbar. ➢Select a media type (we use Vector Images). ➢Select the file folder. ➢The bottom panel of the Catalog displays the content of the folder according to the selected media type. ➢Select the "ASV-016" vector image from the "Artwork > Vector" folder. ➢Drag the image into the workspace to load it.
|
|
➢Select the tooltab EMBROIDERY
➢Click on the Art to Stitch" tool. |
➢Select the Art to Stitch mode: oArt to Stitch (Intelligent): It creates embroidery objects of different kinds (path with running stitches, area with zig-zag stitches, area with pattern stitches) according to the region shape. oArt to Stitch (Area only): It creates embroidery objects of one kind only (area with pattern stitches). |
|
Art to Stitch toolbox
The Art to Stitch toolbox is displayed. You can define some parameters to make the conversion.
The Art to Stitch toolbox has 4 tabs: •Basic Settings •Needle Settings •Stitch Settings |
|
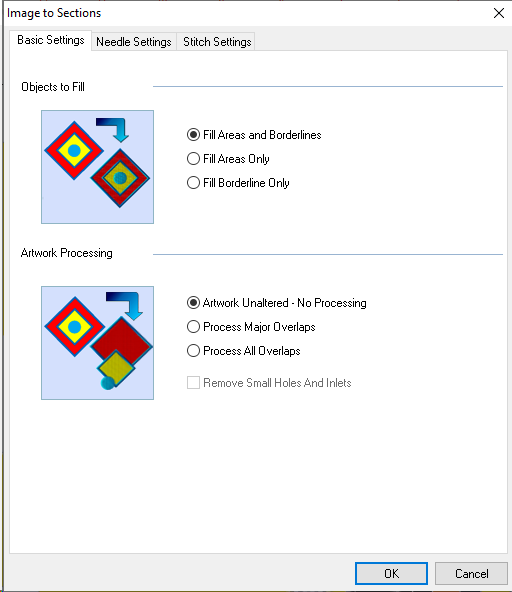
Basic Settings
You can specify which kind of objects to create, and indications about how to process the overlapped objects.
|
➢Specify the type of objects you want for the design.
1.Fill Areas and Borderlines (X) 2.Fill Areas Only 3.Fill Borderline Only
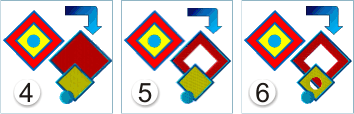
➢Define how to process overlaps (only for vector images)
4.Artwork Unaltered - No processing 5.Process Major Overlaps 6.Process All Overlaps |
Needle Settings
Specify which is the needle and thread color to use for each color of the image.
|
➢Select any of the following options: oOption #1: It is the default option. Allows to use free needles, skip those already in use and redefine their colors according to the artwork colors. oOption #2: Allows to select the starting needle # and redefine their colors according to the artwork colors. Please avoid using the lowers needles. oOption #3: Allows to select the starting needle #, however it will not change the needle colors. Therefore, design colors will look different than the artwork colors. Please avoid using the lowers needles. oOption #4: Allows to assign artwork colors to needles and/or change needle colors manually from the Color Assignment box. |
Stitch Settings
Complete the settings related to the fill stitches and the object recognition parameters.
|
Stitch Settings: ➢Select the pattern type by pressing on the pattern image. ➢Set the running stitch length ➢If necessary, modify the fill style, underlay and compensation properties through the Advanced Settings button. Fabric Settings: ➢Select the fabric type for the design on the drop-down menu. ➢If necessary, use the material editor through the Advanced Settings button Object Recognition: ➢Set the parameters to define the minimum and maximum width to be considered zig-zag stitches: •Minimum ZZ width: Running Stitches will be created for shapes thinner than this value. •Maximum ZZ width: Pattern fill stitches will be created for shapes thicker than this value. |
➢Press the OK button to create the embroidery design according to the image and the defined parameters.
|
|
|
➢Click on the Simulation View button (or F7 key) to hide the background image and show the simulated stitches.