We have prepared a schematic diagram showing the organization of our embroidery digitizing software.
This diagram shows the list of the main activities perfectly integrated in this single application. This application does not require any external application to create a machine embroidery design file starting from any source.
|
Note that the center of the diagram is the design document, which is the condensed design. Users can insert new objects to the design from different sources (image digitizing, lettering, etc). At anytime the design can be converted to embroidery machine design files for production. |
Diagram of the embroidery digitizing software
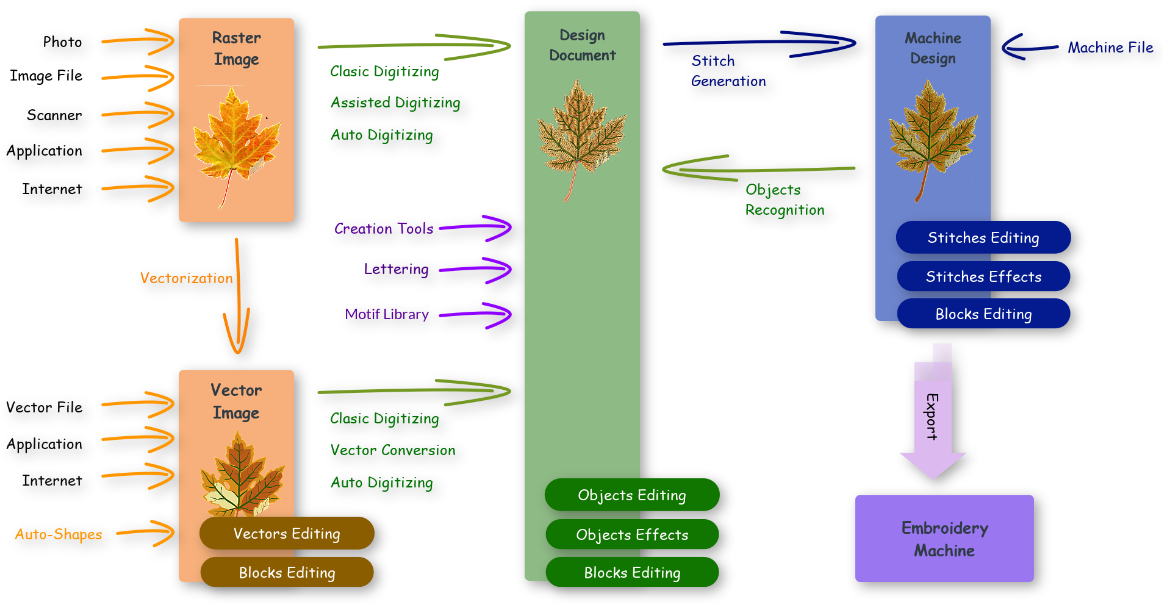 |
Stages of the creation process
1.The creation sequence starts from an image (raster o vector) or from any shape the user can create on the fly (ARTWORK, BACKGROUND).
2.The user can convert all or part of those images into embroidery objects with many different characteristics (DIGITIZING).
3.The software automatically process the objects creating the sequence of stitches and machine commands (STITCH GENERATION).
4.Finally the user can export the stitch information to the proper machine file format (EXPORT DESIGN FILES)
The left side of the diagram (orange color) shows the activities related to the artwork (basically images):
•Import raster images from a photo, from a bitmap file, from a scanner, from other graphic applications, etc.
•Import vector images from a vector graphic file, from other graphic application, from internet, etc.
•The software includes some image editing tools and vector editing tools to improve the artwork quality.
The center of the diagram (green color) shows the activities related to the design document (condensed design). The design document is a set embroidery objects, each one defined by a geometry and custom embroidery fill properties.
•Digitize the artwork (images) to create embroidery objects.
•Create embroidery objects using the creation tools.
•Add embroidery texts using the embroidery lettering system.
•The software includes many advanced object editing tools to customize the designs.
The upper-right side of the diagram (blue color) shows the activities related to the machine design (expanded design). The machine design is a sequence of stitches and machine commands.
•No need to generate stitches for each embroidery object, as the software makes it automatically.
•The software includes many stitch editing tools to adjust any small detail of the designs.
•After the design is finished, it can be exported to different embroidery machine file formats
Note:
Available activities depends on the software configuration.